MIDI API
10th March, 2018
6 min read
Many modern browsers allow you to access your audio and MIDI hardware - that means you can build synths!
As a quick proof-of-concept I'll show how to grab data from a MIDI keyboard.
I'll create a simple synth and perhaps even a sequencer in later articles.
Demo
Clone my browsersynth repo.
MIDI API
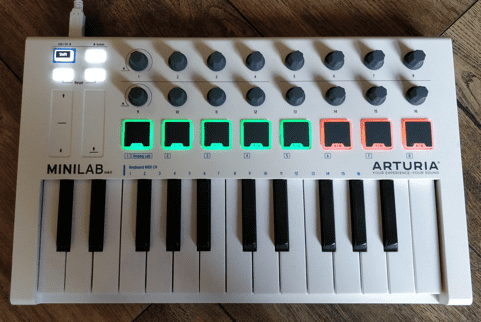
First we need to get some data from the keyboard - here's mine!
MIDIAccess
You first need to request access to the MIDI API which returns an MIDIAccess object that allows us access the devices connected to your laptop.
navigator.requestMIDIAccess().then(access => {
  const inputs = access.inputs.values();
  for (const device of inputs) {
    // each device is an instance of MIDIInput
    console.log(device);
  }
});
// {
//   connection: "closed";
//   id: "1995985220";
//   manufacturer: "Arturia";
//   name: "Arturia MiniLab mkII";
//   onstatechange: null;
//   state: "connected";
//   type: "output";
//   version: "";
// }
MIDIInput - handling messages
We have access to the MIDIInput device now so we can assign a handler to the onmidimessage property and see what happens when we mash some buttons on the keyboard.
navigator.requestMIDIAccess().then(access => {
  const inputs = access.inputs.values();
  for (const device of inputs) {
    device.onmidimessage = midiMessageHandler;
  }
});

const midiMessageHandler = message => {
  console.log(midiMessageHandler);
};
Now if we hit a key we'll see some messages
// key down
{
  bubbles: true,
  cancelBubble: false,
  cancelable: false,
  composed: false,
  currentTarget: {
    connection: "open"
    id: "-1528047634"
    manufacturer: "Arturia"
    name: "Arturia MiniLab mkII"
    onmidimessage: message => { console.log(message); }
    onstatechange: null
    state: "connected"
    type: "input"
    version: ""
  },
  data: [144, 48, 62],
  defaultPrevented: false,
  eventPhase: 0,
  isTrusted: true,
  path: [],
  returnValue: true,
  srcElement: {
    // ... some stuff
  },
  target: {
    // ... some stuff
  },
  timeStamp: 2658865.7999999123,
  type: "midimessage",
}
MIDI messages
The data property is most interesting to us
message.data = [144, 48, 62];The array of values is a MIDI message
[command, byte1, byte2];The command refers to actions a MIDI instrument/component should be taking - play a note (note on), stop playing a note (note off), change the sound (program change) etc.
The command is usually expressed as a hexadecimal as you'll see below, and the byte values usually range from 0 to 127.
- 128 - 143 - hex -> 0x80 - 0x8F : note off
- 144 - 159 - hex -> 0x90 - 0x9F : note on
The decimal codes are hard to memorise - 128 to 142 - but the hexadecimal representation is much easier - 0x80 to 0x8F.
The details of most common commands and byte values are clearer when laid out in a table
| Name | Command | Byte 1 | Byte 2 |
|---|---|---|---|
| note off | 128 - 143 : 0x80 - 0x8F | Key 0 - 127 | Off velocity 0 - 127 |
| note on | 144 - 159 : 0x90 - 0x9F | Key 0 - 127 | On velocity 0 - 127 |
| Poly key pressure | 160 - 175 : 0xA0 - 0xAf | Key 0 - 127 | Pressure 0 - 127 |
| Control change | 176 - 191 : 0xB0 - 0xBF | Control 0 - 127 | Control value 0 - 127 |
| Program change | 192 - 207 : 0xC0 - 0xCF | Program 0 - 127 | n/a |
| Pitch bend | 224 - 239 : 0xE0 - 0xEF | Range low | Range High |
You'll notice each command covers a range of 16 values. The MIDI specification defines 16 MIDI channels. You can assign an instrument or input device to a specific channel allowing simple separation of message sources and destinations.
In my implementation of a MIDI handler I take each MIDI command and use the MSB (most significant bit) to determine what command is being received and the LSB (least significant bit) to determine on which channel the message is played (or should be relayed).
This is fairly simple using bit masking
const cmd = 0x84; // note on, MIDI channel 5
const cmd_band = cmd & 0xf0; // 0x80
const channel_num = (cmd & 0x0f) + 1; // 5
Arturia Minilab
On my keyboard the commands are mapped like so
-
On the keyboard
- 0x80 (128) : note off
- 0x90 (144) : note on
-
on drum-pad 1-8
- 0x89 (137) : note off
- 0x99 (153) : note on
- 0xA9 (169) : poly pressure
-
on drum-pad 9-16
- 0xB0 (176) : control change
-
knobs 1 and 9 - twist (output values only vary from 61 to 67)
- 0xB0 (176) : control change
-
knobs 1 and 9 - click (output is 0 or 127, no in-between)
- 0xB0 (176) : control change
-
knobs 1 and 9 with 'shift' clicked (values from 0 - 127))
- 0xB0 (176) : control change
-
knobs 2-8 and 10-16 (all twist; values from 0 - 127)
- 0xB0 (176) : control change
This is left here mainly as reference for later work. The control knob numbers have odd, non-consecutive mappings, so I will need to map those out in a graphic.
Monitoring the commands
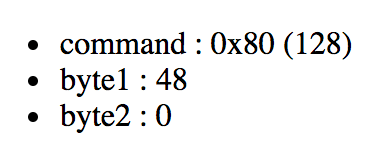
It would be nice to see the messages on the screen instead of just the console, so we'll add an element to the screen where we can display the MIDI messages as they arrive.
<body>
    <div id="messager"></div>
</body>
The data we get from the MIDI Api is all decimal so we want to convert the command to hexadecimal
const cmd_value = 128;
cmd_value.toString(16); // outputs 80; 128 in hex!
We'll also use template literals and array destructuring to clean up the output
const message_template = message => {
  const [cmd, byte1, byte2] = message.data;
  return `
      <ul>
        <li>command : 0x${cmd.toString(16).toUpperCase()} (${cmd})</li>
        <li>byte1 : ${byte1}</li>
        <li>byte2 : ${byte2}</li>
      </ul>`;
};
Nothing to write home about.
The monitor demo in the browsersynth repo will eventually have a more sophisticated approach that will track the sometimes complex messages received for a note or control to make it clearer what is happening. For instance, a drum-pad has a bunch of MIDI messages even for a simple fast tap - note on, then a range of poly pressure and finally note off. Visualising these can be useful and will be addressed in later version of the MIDI monitoring demo.
Other blog posts in this series
Synth Basics
April 8th 2018 - 9 min read
As you may want to create synths using the synth 'framework' I'm working on, I'll run through some of the basics of synthesisers. Program A pre-programmed combination of voices and effects…


